.png?width=1440&name=How%20to%20Add%20a%203D%20Product%20Configurator%20to%20Your%20WordPress%20Website%20(Complete%20B2B%20Guide).png)

First—Why Your WordPress Website Needs a Product Configurator
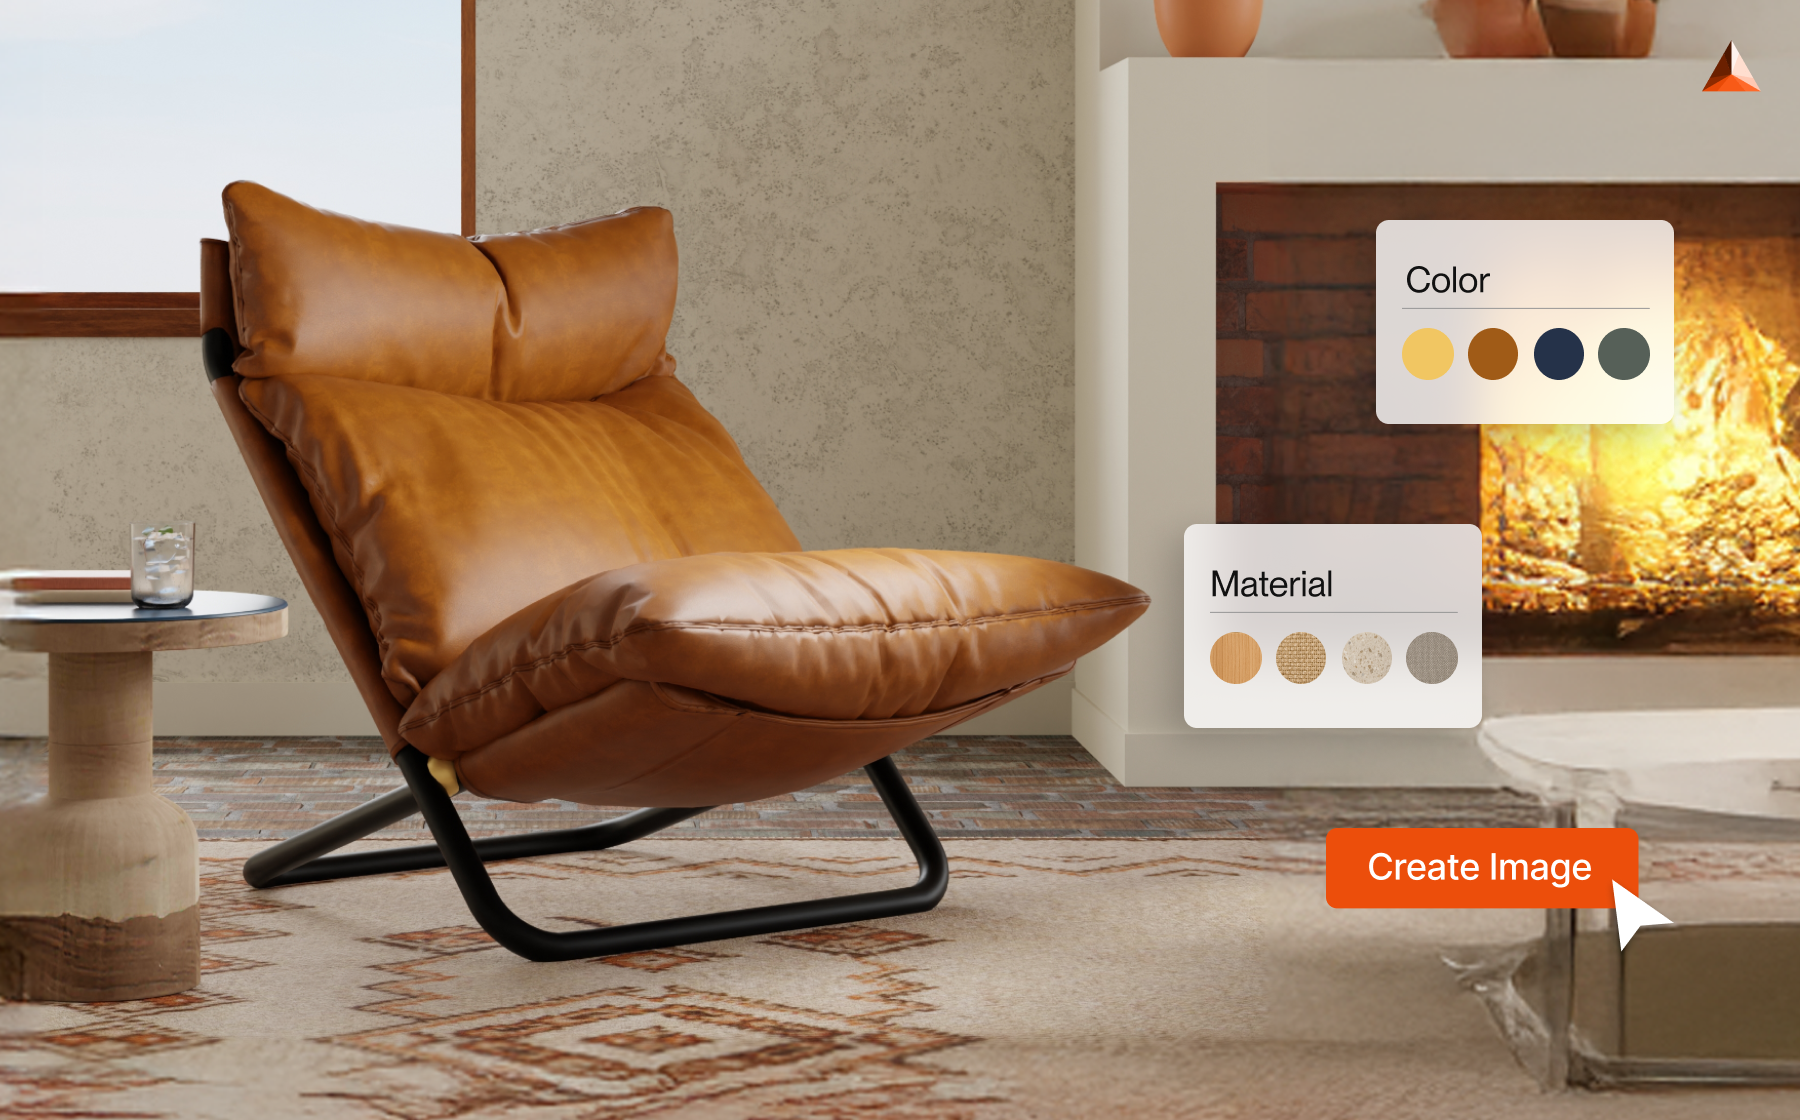
A 3D configurator isn’t just a “nice visual tool.” It’s a revenue engine. When customers can customize products in real time, see accurate visuals, and explore every detail, it directly impacts their buying decisions.
Here’s what businesses see after adding a configurator:
1. Higher Conversion Rates
When shoppers can see exactly what they’re getting—down to the finish, color, material, or size—they reach a buying decision much faster.
A configurator eliminates uncertainty, builds confidence, and shortens the path to checkout. This is especially important for products where personalization or design choices deeply influence purchase behavior, like mattresses, furniture, home appliances, or modular systems.
2. Fewer Returns and Customer Complaints
Most returns happen because the product a customer receives doesn’t match what they pictured. A 3D configurator reduces that gap by giving buyers an accurate, high-quality preview of the final product from every angle.
When paired with AR “view in room,” shoppers can also place the configured item in their real space to check fit, scale, and visual harmony with existing décor.
This added clarity helps them make confident decisions, resulting in fewer mismatched expectations—and significantly fewer returns and complaints.
3. Higher Average Order Value (AOV)
When shoppers see upgrades visually—premium fabrics, better textures, improved finishes, add-ons, accessories—they are more likely to choose them.
A configurator turns upselling and cross-selling into a natural part of the buying process, not a forced add-on.
4. A More Premium Customer Experience
A 3D configurator makes your brand feel modern, tech-forward, and customer-centric. It gives shoppers an interactive shopping experience that mirrors in-store product exploration—even online. The result? Higher trust, higher engagement, and stronger brand perception.
5. Better Insights Into Buyer Preferences
Beyond visual impact, a 3D configurator also captures valuable data on how shoppers interact with your products—such as which finishes, materials, sizes, or configurations they explore the most.
These insights help you understand demand patterns, refine product offerings, and make smarter decisions around inventory, design, and merchandising.
Where WordPress Configurator Integrations Go Wrong
WordPress is incredibly flexible, but that flexibility comes with a catch: if you add plugins or tools that aren’t optimized for performance, your site speed can drop instantly. This is where many brands run into trouble. Common issues happen when configurators:
- Load heavy scripts the moment the page loads
- Inject unoptimized iframes that disrupt the layout
- Conflict with themes or page builders like Elementor and Divi
- Load 3D assets without compression or CDN support
- Interfere with WooCommerce product variations
- Cause CLS (Cumulative Layout Shift) spikes that harm SEO
These problems don’t happen because WordPress is weak—they happen because the configurator wasn’t built with performance in mind. The good news: modern platforms like imagine.io solve all of this through smarter architecture, lightweight embedding, and global CDN delivery. But before we go into integration, let’s understand what a good configurator should offer.
What to Look for in a Performance-Friendly WordPress 3D Configurator
To avoid performance issues and ensure your customers get a smooth experience, your configurator needs a few foundational features. Here’s what to look for—explained in business-friendly terms:
1. Lazy Loading (This Is Critical)
Lazy loading means the configurator doesn’t load immediately when someone opens your page. Instead, it loads only when the user interacts or scrolls to the section.
Why does this matter?
- Your site loads fast
- Your SEO stays strong
- Your homepage and product pages don’t become heavy
Lazy loading protects your Core Web Vitals, which directly influence conversions and search rankings.
2. CDN Delivery for 3D Assets
3D models, textures, and files can be large. If they’re not delivered through a global Content Delivery Network (CDN), your site will feel slow for users in other regions.
A CDN ensures:
- Faster global load times
- Consistent user experience
- Lower bandwidth and server load
imagine.io delivers all 3D assets via a global CDN so customers everywhere get instant, smooth performance.
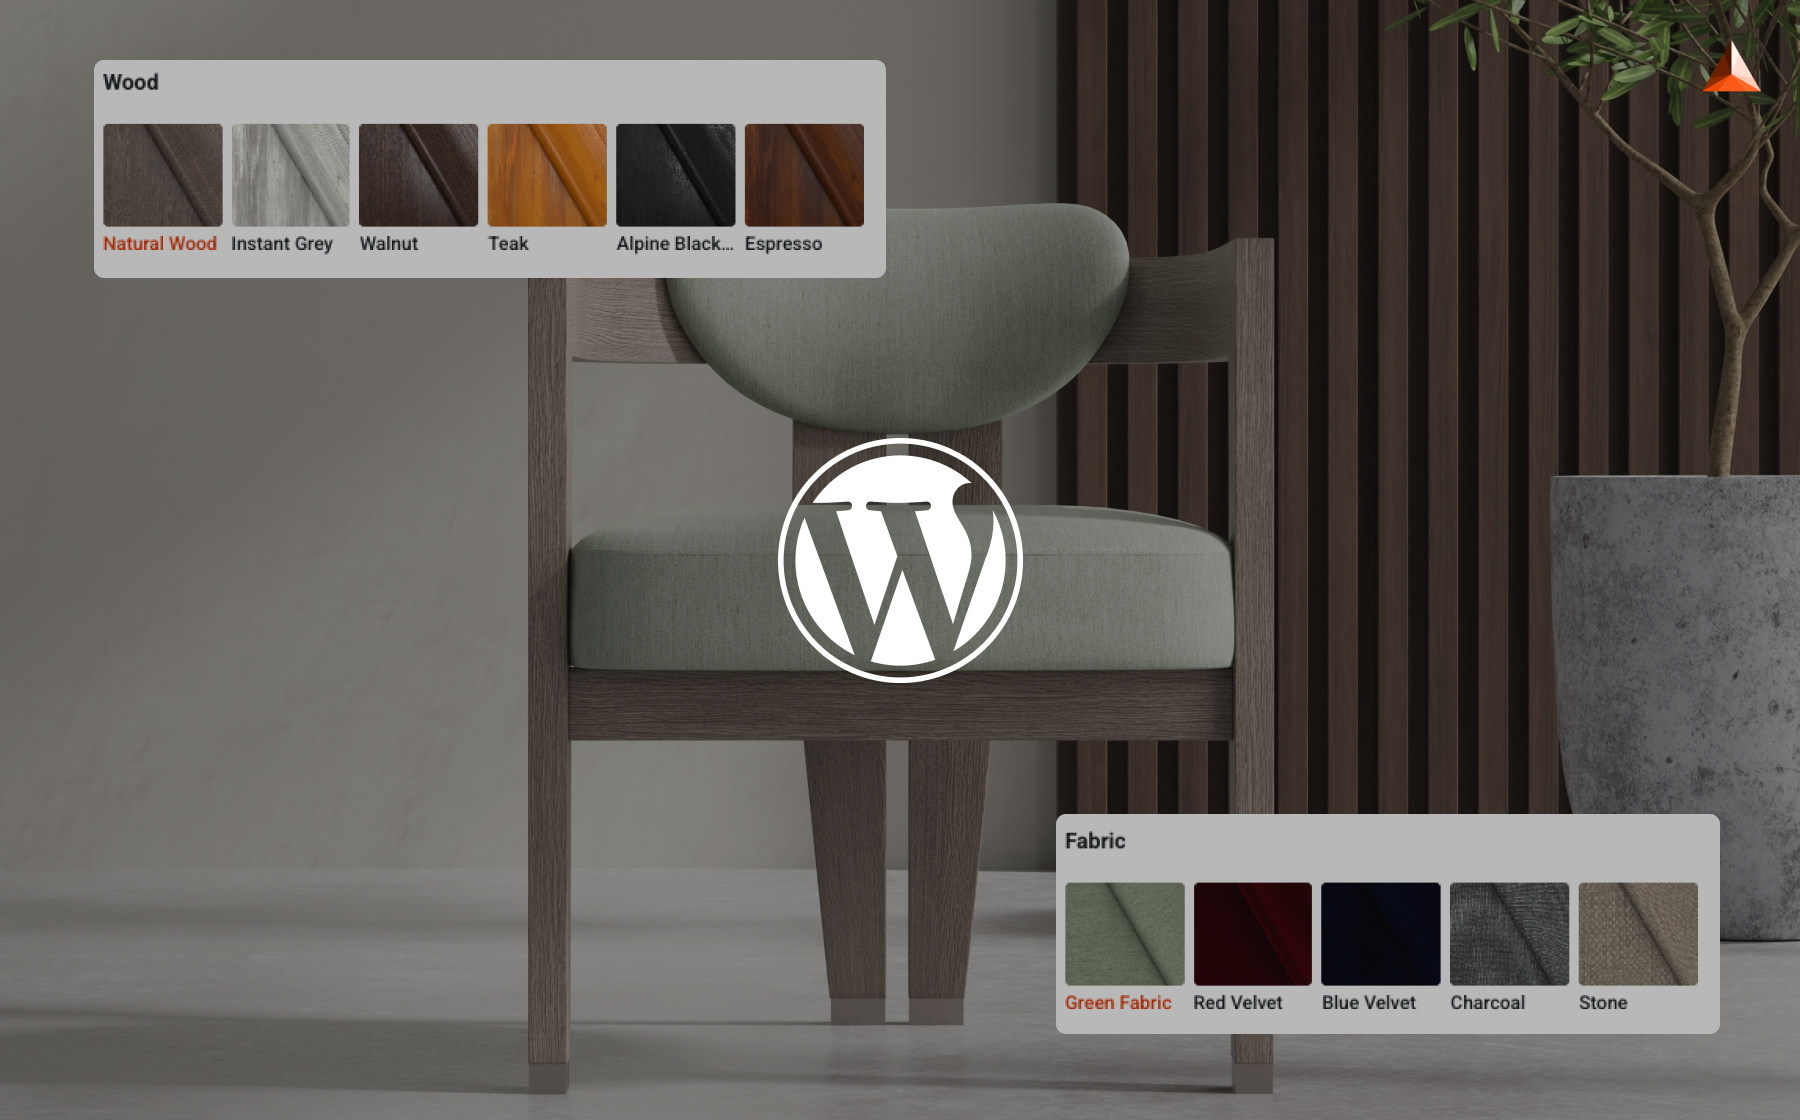
3. Flexible Integration With Any WordPress Setup
Your configurator should work whether your team uses:
- Gutenberg
- Elementor
- Divi
- Classic Editor
- A custom WordPress theme
- WooCommerce
- Headless WordPress
- A custom front-end
A modern configurator should adapt to your setup—not force you to change your website.
4. Clean, Non-Intrusive Embeds
Some configurators dump messy CSS or scripts onto your site, which can break your layout. You want a clean embed that respects your theme and doesn’t modify your front end. This gives your team full creative control while keeping the site stable.
5. SEO & Web Vitals-Friendly Behavior
Your configurator should never harm:
- LCP (How fast your main content loads)
- CLS (Unexpected layout shifts)
- INP (How fast your page responds to interactions)
imagine.io is built specifically to protect these metrics. Now that you know what to look for, let’s walk through the actual process of adding a configurator to your WordPress site.
Even if you choose the right configurator, the way you integrate it determines whether your site stays fast, stable, and SEO-friendly. So let’s walk through the exact integration workflow that mid-market and enterprise teams follow.
Step-by-Step: How to Add a 3D Product Configurator to Your WordPress Website
Step 1: Test Everything in a Staging Environment
Before you install or embed anything, this must happen in a controlled staging environment. This protects your live site and ensures the configurator doesn’t introduce layout issues or slowdowns.
During this step, your team checks:
-
Script loading: They verify that the configurator’s scripts do not interrupt your page’s main loading sequence. If scripts load too early, they can delay the loading of important page elements and affect Core Web Vitals.
- Plugin behavior: WordPress plugins interact with each other in unpredictable ways. Your team checks whether the configurator conflicts with your page builder, caching tools, performance plugins, or custom functions.
- Responsiveness: The configurator must resize correctly across screen sizes. If not tested early, it may break mobile layouts.
- DOM injection: This ensures the configurator appears exactly where it’s supposed to—inside the correct block or container—without pushing other page elements around.
- Network performance: 3D models, textures, and assets must load efficiently, especially for global visitors. If network requests are too heavy, your site can slow down significantly.
-
Theme compatibility: Your WordPress theme should remain visually intact. A well-built configurator will not interfere with your CSS or layout.
Step 2: Integrate via a Custom Block or Embed
Once staging looks good, the configurator is added to your actual WordPress pages. This is typically done through one of the following:
-
Gutenberg custom block: Best for WordPress’s native editor. Your team can place the configurator exactly where they want it.
-
Shortcode embed: A simple shortcode provides flexibility and works well for pages built using different editors.
-
Elementor or Divi embed widget: Ideal for brands using visual builders. Your team can embed the configurator inside any page layout.
-
Custom plugin section: Useful for enterprise setups where teams want more control over the configuration logic.
In all cases, the configurator should support lazy loading. That means it loads only when the user interacts or scrolls to that section, not on the initial page load. This is essential for protecting page speed and Web Vitals.
Step 3: Monitor Performance Before and After Integration
After embedding the configurator, your team must run performance tests again to ensure nothing has been negatively affected. They typically use Lighthouse, GTmetrix, or WebPageTest. Here’s what they look for:
-
Script execution time: How long the configurator’s scripts take to process. High execution time means slower pages.
-
CLS (Cumulative Layout Shift): This measures unexpected movement of page elements. A poorly integrated configurator can cause noticeable layout jumps.
-
LCP (Largest Contentful Paint): This checks how quickly your main content loads. The configurator should not slow down your product page’s primary elements.
-
Render-blocking resources: If the configurator loads blocking scripts, it can delay your page from loading quickly. Brands that skip this step often discover issues only after customers complain or conversions drop.
Step 4: Connect With WooCommerce Variants (Optional)
If your configurator is purely visual, this step may not apply. But if your customers are customizing a product and then adding that exact configuration to their cart, integration with WooCommerce is essential. Teams typically do this via:
-
WooCommerce REST API: Automatically passes the chosen configuration (color, size, material) to WooCommerce so it appears correctly in the cart.
-
WooCommerce hooks: Allows WordPress to “listen” for updates from the configurator and adjust the product selection accordingly.
-
Custom middleware: Useful for complex products that require multiple attributes to be synchronized.
The key idea is simple: Whatever the shopper builds visually should reflect perfectly in their checkout experience.
Step 5: Run Full QA Across Devices and Browsers
Quality assurance is often overlooked, but it is one of the most important steps. Your configurator must work smoothly for all users—not just on the desktop. Your team tests it across:
- iOS and Android
- Chrome, Safari, Firefox, and Edge
- Various screen sizes
- Different network speeds
They check:
-
Touch interaction and gestures: The configurator must be easy to rotate, zoom, and navigate on mobile.
-
Material switching: Changing colors, fabrics, or finishes should feel instant, not sluggish.
-
Responsive rendering: The configurator should adjust its layout without cropping, overlapping, or breaking the page.
Many customers use mobile devices during product research and customization. If the configurator doesn’t perform well here, conversions drop quickly.
How imagine.io Makes Adding a 3D Product Configurator to WordPress Effortless
If you’re worried that adding a 3D product configurator might slow down your WordPress site or turn into a dev-heavy project, don’t be. imagine.io is built to make the entire process smooth, fast, and incredibly manageable for your team.
Here’s how we keep things simple:
-
Lightweight embeds that load only when needed: Your configurator doesn’t slow down the page. It loads only when someone interacts with it, keeping your site fast and user-friendly.
-
All 3D assets are delivered through a global CDN: Every model, texture, and render loads quickly — no matter where your buyers are located.
-
Easy API-based integration for WordPress or WooCommerce: Your developers can plug the configurator into any WordPress setup, whether it’s classic, block-based, or headless.
-
Fully flexible styling: The configurator fits naturally into your theme. Colors, layouts, UI elements — your team can match everything to your brand without breaking design consistency.
-
Safe testing before you go live: With sandbox environments, your dev team can experiment, preview updates, and validate performance without touching the live site.
-
Works with your existing eCommerce stack: Whether you use WooCommerce or a custom checkout flow, the configurator integrates smoothly with your current setup.
Conclusion
A WordPress 3D product configurator can elevate your customer experience, increase conversions, and reduce returns—but only if integrated correctly. When you use a platform that:
- Supports lazy loading
- Respects your CSS and DOM
- Works seamlessly with WooCommerce
- Delivers assets through global CDNs
- Supports enterprise workflows and API integrations
…you get the best of both worlds: performance + personalization.
If you’re evaluating 3D configurator solutions for your WordPress or WooCommerce site, and performance is a priority, it’s worth seeing what imagine.io can do. Ready to see it in action?
Talk to our experts and explore how seamlessly a configurator can fit into your WordPress experience—without slowing anything down.
.gif?width=1296&height=1296&name=Untitled%20design%20(8).gif)
Book a demo with our experts


.png?width=500&name=How%20to%20Add%20a%203D%20Product%20Configurator%20to%20Your%20WordPress%20Website%20(Complete%20B2B%20Guide).png)


%20(1).png?width=500&name=Why%20Exploded%20Mattress%20Views%20Matter%20(And%20How%20to%20Generate%20Them)%20(1).png)
.png?width=500&name=Best%20Shopify%20Product%20Configurator_%20How%20to%20Choose%20the%20Right%20One%20(2).png)
.png?width=500&name=Why%20Exploded%20Mattress%20Views%20Matter%20(And%20How%20to%20Generate%20Them).png)


.png?width=500&name=Best%20Shopify%20Product%20Configurator_%20How%20to%20Choose%20the%20Right%20One%20(1).png)


.png?width=500&name=How%203D%20Rendering%20Can%20Make%20or%20Break%20Your%20Industrial%20Design%20Pitch%20(1).png)


%20with%20Digital%20Twins%20and%203D%20Visualization.png?width=500&name=Optimizing%20Your%20Digital%20Asset%20Management%20(DAM)%20with%20Digital%20Twins%20and%203D%20Visualization.png)


